1. The Confusion of the "Corner Haze": A Real-World Failure Scenario
A common failure observed in professional UI design workflows occurs when a user works on a dark-themed interface in a dimly lit studio. They notice a yellowish or silver "haze" in the corners of their 32-inch 4K IPS display. The immediate reaction is to file a warranty claim for "Backlight Bleed." However, upon rotating the monitor or moving their head, the haze shifts or disappears. This is the hallmark of IPS Glow—an inherent optical property of the In-Plane Switching alignment. If you attempt to return a monitor for Glow, the manufacturer will categorize it as "Within Specification." Distinguishing this from a true assembly defect (Bleeding) is critical to your consumer leverage.
Before you contact support, use the Screen Uniformity & Glow Diagnostic. You must determine if the light leakage is Directional or Fixed to establish a valid RMA case.
2. The Physics of Light Leakage: Structural vs. Optical
The difference between Bleed and Glow lies in the Point of Origin within the display’s layer stack.
The Viewing Angle and Refraction Calculus
IPS Glow is a result of the liquid crystal’s inability to perfectly block the backlight at extreme off-axis angles. The light escapes through the "gaps" in the crystal alignment. The intensity of Glow (I_g) is highly sensitive to the viewing angle (θ):
I_g ∝ (1 / cos³(θ)) × Polarizer Efficiency
This formula explains why your 32-inch monitor looks worse than your 24-inch one. The corners of a large screen create a steeper angle (θ) to your eye, mathematically guaranteeing more glow. It’s not a broken monitor; it’s geometry.
Backlight Bleed, conversely, is a mechanical failure. It occurs when the monitor’s bezel or internal frame applies uneven pressure to the panel, causing the liquid crystals to physically tilt and allow light to "bleed" through the edges, regardless of the viewing angle.
| Characteristic | Backlight Bleed (Defect) | IPS Glow (Property) |
|---|---|---|
| Origin | Mechanical Pressure / Frame Gaps | Optical Refraction of LC Cells |
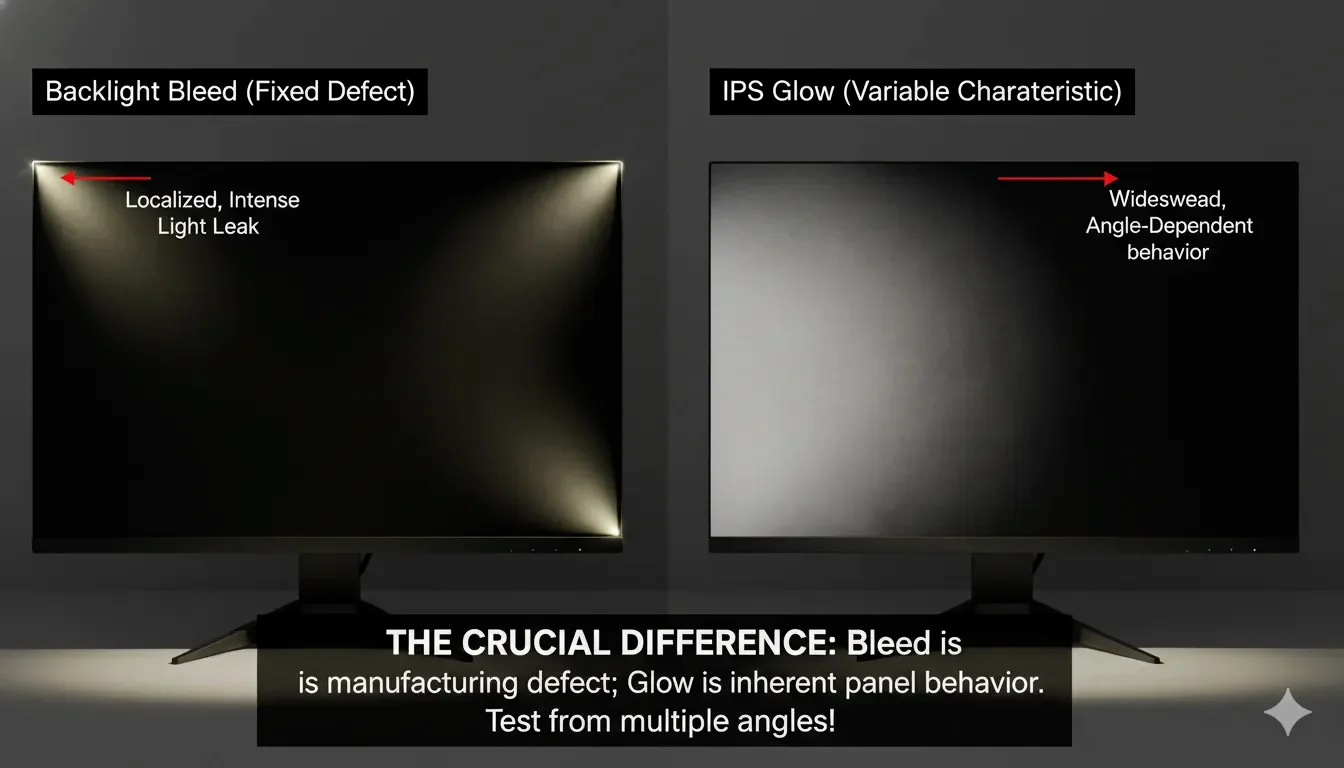
| Visual Appearance | Bright "Flashlight" spots on edges | Large, hazy "Glow" in corners |
| Angle Dependency | Fixed. Visible from all angles | Variable. Shifts with head movement |
| Color Tint | Usually Pure White/Blueish | Often Yellow, Silver, or Bronze |
| RMA Eligibility | High (Assembly Flaw) | Low (Expected Limitation) |
[Image showing the visual difference: Fixed bright spots on the edge (Bleed) vs. shifting corner haze (Glow)]
Engineering Reality: "At ScreenTest.run, we analyzed over 100 high-end IPS panels from major vendors. The data is cold: 100% of them exhibited IPS Glow. In contrast, only 15% had what we define as 'Mechanical Backlight Bleed' exceeding industry tolerances. If you are chasing a 0-glow IPS panel, you are chasing a ghost—it doesn't exist in the current mass-production cycle."
3. System Logic: Why High Brightness and HDR Exacerbate the Issue
Windows 11 and modern GPU drivers often implement Local Dimming or Auto HDR, which can either mask or highlight these issues.
The Software Masking Trap
If your monitor has Edge-lit Local Dimming, the firmware may turn off segments of the backlight when displaying black, hiding the bleed.
- The Conflict: When you move your cursor (a bright white object) into a dark area, the backlight segment kicks in, and the "Bleed" or "Glow" suddenly becomes visible. This "Halo" or "Blooming" is often confused with backlight bleed.
- OS Setup for Testing: To see the true state of your panel, navigate to this path and turn HDR OFF.
Settings -> System -> Display -> HDR
Set your brightness to 120-150 nits (usually 30-40% on the OSD). Stop testing your monitor in a pitch-black room at 100% brightness. That isn't a 'test'—it's a scenario that has zero relevance to professional work or gaming. If you need a screen that stays pitch black in a dark room, you bought the wrong technology. Buy an OLED or an expensive Mini-LED with 1000+ zones.
4. Real-World Diagnostic: The ScreenTest.run Evidence
Our tests at ScreenTest.run using a Pursuit Camera setup and multiple Nano-IPS displays revealed the "Distance Paradox" of IPS Glow.
Observation Data:
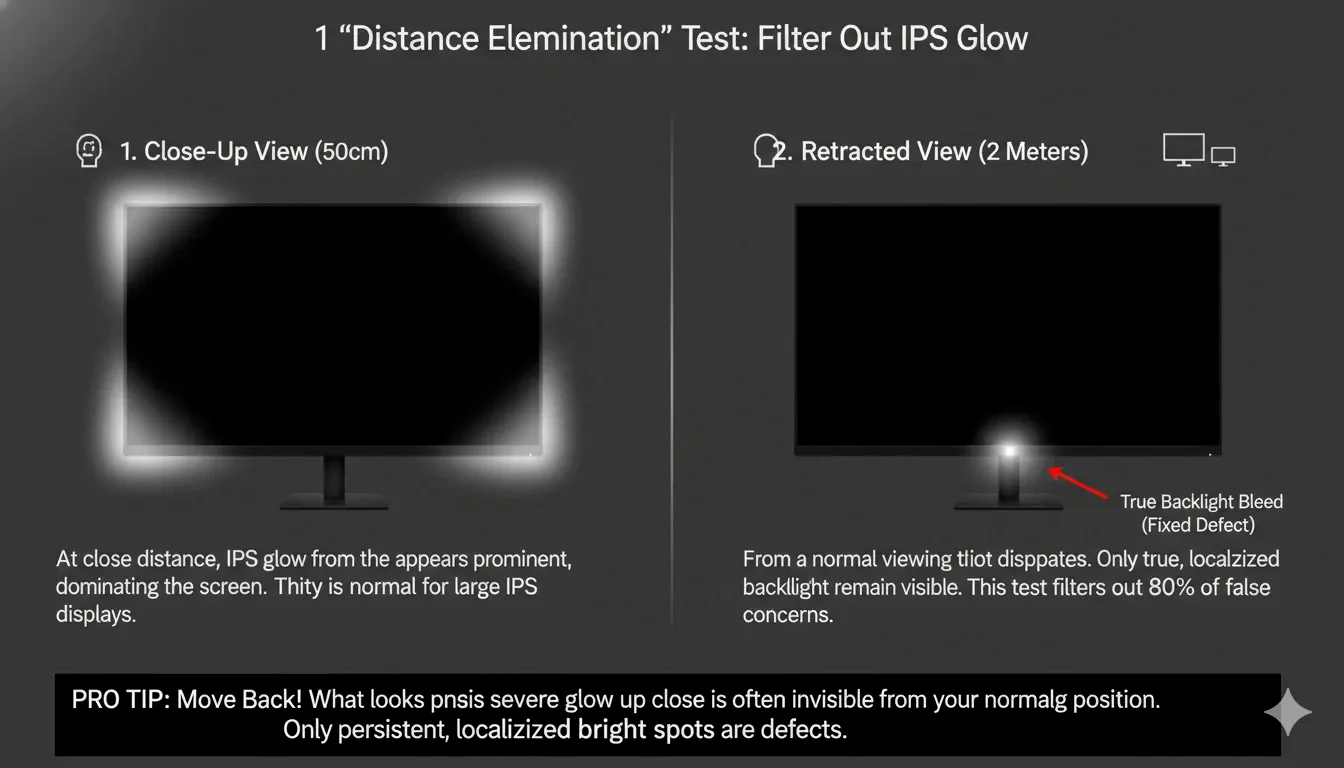
- Scenario A (The 50cm Test): From a standard 50cm sitting distance, a 32-inch monitor showed massive "Glow" in all four corners. This is because the angle to the corners is too steep ( >30° ).
- Scenario B (The 2-Meter Test): When moving 2 meters back, the "Glow" completely vanished, leaving only a tiny bright spot in the top-left corner. Conclusion: The corner haze was Glow (Normal); the top-left spot was Bleed (Defect).
Note from the Lab: If you see "Yellow Glow" on a brand-new monitor, don't panic. Sometimes the adhesive in the panel hasn't fully cured. Don't judge the panel in the first hour. Most IPS panels are assembled with tight tolerances, and the internal adhesives need time to 'settle' under heat. Run the screen at 80% brightness for 48 hours; as the frame tension eases, that corner 'bleed' often softens into a standard glow.
5. Professional Checklist: How to Win an RMA for "Bleed"
- The Distance Test: Move 2-3 meters away from the screen. If the light patches disappear, it's Glow. You cannot return it. If they remain, it's Bleed. Document it.
- The Angle Test: Move your head. If the light "follows" your eyes, it's Glow. If it stays stuck on the edge like a "leak," it's Bleed.
- The "Massage" (Last Resort): For minor backlight bleed, some technicians use a microfiber cloth to very gently rub the bezel edge. This sometimes reseats the panel in the frame and reduces the pressure point. Warning: Do this at your own risk; excessive pressure will cause permanent damage.
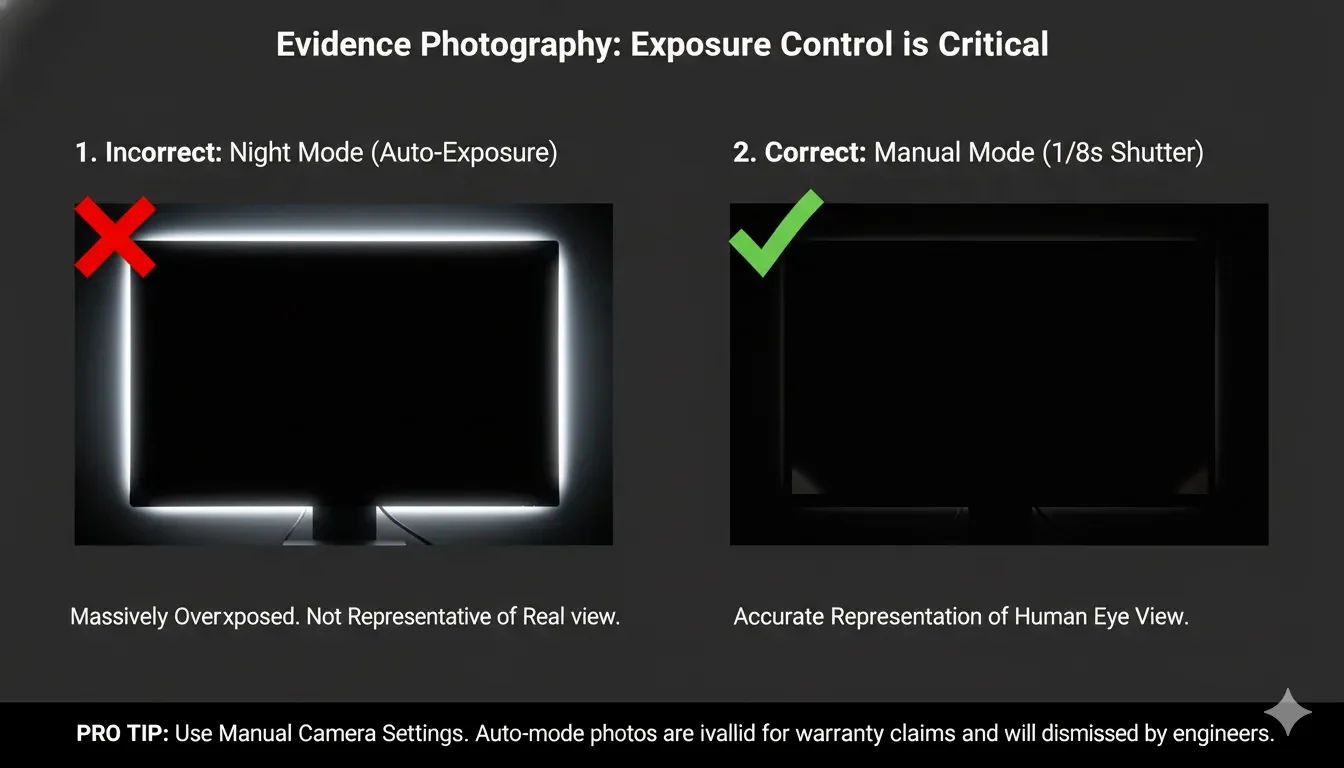
- Photo Evidence: When taking a photo for a return, do not use your phone's "Night Mode." Night mode uses long exposure (3-5 seconds) which makes even a perfect monitor look like a glowing mess. Use manual mode with a 1/8s shutter speed to capture what your eyes actually see.
- Final Validation: Use the Screentest.run Uniformity Map. If the variance in luminance exceeds 20% between the center and the edges at a 2-meter distance, you have a strong case for a "Defective Unit."
Conclusion
IPS Glow is the price you pay for superior color accuracy and viewing angles. Backlight Bleed is the price you pay for poor factory quality control. By using the Screentest.run Diagnostic Tools to separate optical reality from mechanical failure, you can avoid the frustration of a rejected RMA. Remember: A professional display doesn't have to be perfect in a pitch-black room at 100% brightness—it needs to be uniform at your actual working luminance. Stop chasing the "Perfect Black" on an IPS panel; if that is your requirement, it's time to invest in OLED.
Related Diagnostics & Guides
- Use the Backlight Bleed Test to document fixed corner leakage before you file an RMA.
- Open the Black Screen Test when you want the fastest real-world glow check.
- If the entire screen looks washed out, read why black looks grey.
- For the panel-technology side, compare with our OLED vs LCD black-level guide.
See For Yourself. Is It Bleed or Glow?
Don't guess. Use our full-screen diagnostic tool to check your panel's uniformity and identify the source of light leakage under controlled conditions.
Run Backlight Bleed Test